When my mother-in-law passed me the massive bag of red gooseberries, I had two choices: I could either make them into something to eat, or something to drink. Taking the vote to social media, the response was overwhelmingly in favour of the latter (no surprise there).
My next choice was whether to follow the recipe in my 'Drink Your Own Garden' book which happens to be as old as I am (no googling, please!) or to just ask my mum who, by all accounts, has been home-brewing just as long.
Maybe it was giving birth to me that turned her onto it, who knows?
Maybe it was giving birth to me that turned her onto it, who knows?
Anyway, again I chose the latter. Mainly because I find mum's method much simpler and also it requires less jiggery-pokery involving enzymes and other chemicals I've never heard of.
That said, as well as the red gooseberry base and a stock of granulated sugar, I would recommend having a pot of yeast nutrient in the cupboard just to help your brew along, should it not start fermenting as expected.
Also, you will need to buy some Bruclens cleaner and steriliser as you will need to sterilise everything before use. This is very important as you don't want to make anyone ill.
Generally, all of the items and equipment you need can be bought fairly cheaply from a local hardware store. For me, Wilko's is my one stop wine-making shop as it stocks everything I need without it costing me the earth.
To make about 6 bottles of wine, you will need:
Brucleans cleaner and steriliser
1.8 kg / 4 lb red gooseberries
1.1 kg / 2.5 lb granulated sugar
500 g / 1.1 lb raisins or sultanas (for body)
500 g / 1.1 lb raisins or sultanas (for body)
Yeast nutrient
10 litre/2 gallon plastic fermenting tub
Plastic sieve (don't use a metal one - see my Instagram for why!)
A piece of muslin, pegs and a couple of large kitchen bowls
A funnel and a jug
A glass demijohn, valve and rubber bung
A siphon tube and tap
6 empty, clean and sterilised wine bottles
1. Put the gooseberries and raisins in the fermenting tub. They don't need to be peeled or prepared in any way.
Larger or thick-skinned fruit such as grapefruit would benefit from being chopped down into chunks at this stage, to help release the juice, but the gooseberries need no such preparation. The amount of sugar required may also fluctuate, depending on the sweetness of the fruit used.
2. Add hot water from the kettle up to the 1 gallon mark. When cooled, give the fruit a squeeze.
3. For the next two days, squeeze the fruit daily. You should then start to see the fruit beginning to ferment. You will know this is happening if you can see bubbles in the liquid and a scum layer starting to form on the top.
If it has not started fermenting, leave it a further two days, without stirring, then check again.
If, at this point, it has still stubbornly refused to start fermenting, add 1 rounded teaspoon of yeast nutrient with the sugar (step 5).
4. Stir the fruit well and strain through the plastic sieve back into the bucket.
I find the easiest way to do this is to empty the fruit into a couple of your largest kitchen mixing bowls so that you can then strain directly through the sieve back into the tub.
5. Once strained, add the sugar to the tub (and yeast, if necessary), and stir until dissolved.
6. For two days, stir the fruit daily.
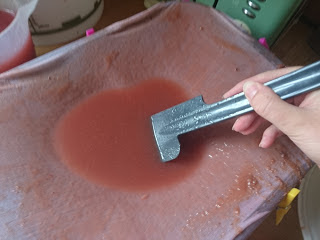
7. After two days, you will now need to strain the fruit into the demijohn. However this time you will need to strain it through the muslin in order to try and remove as much further bulk as possible and leave only the juice.
I recommend pegging your muslin across the top of a washing up bowl or another bowl of equivalent size as the larger the surface area, the less time the straining will take (although choose too big a bowl and your muslin will collapse into it).
I'm going to be honest - this can get messy and may take longer than you think, so prepare to set aside a couple of hours or so when you know you won't be disturbed and can focus on the task at hand.
Once done, you can then pour the resultant juice from the bowl easily through your funnel into the narrow neck of the demijohn.
Top up the demijohn with cold water and fit the rubber bung and valve in place.
8. Leave for 6 months until the liquid is completely clear and has stopped bubbling. At the end of this time, you will see a sediment layer of about a couple of inches has formed at the base of the demijohn. Try not to shake or move the demijohn with any vigour or the sediment will easily rise and you will have to wait until it has settled again.
If, after a couple of weeks in the demijohn, a large layer of sediment has already formed, Mum recommends siphoning off the clearer liquid from the thick sediment and returning it to the demijohn. This is so that after the 6 months, there will be as little sediment present as possible. And the less sediment there is, the more liquid can be siphoned off for drinking!
9. If the wine tastes too sweet at the end of the 6 months, leave it a little longer as it is not ready.
Once ready, however, it is time to siphon the wine into sterilised bottles. And if you're currently wondering how on earth you will be able to amass 6 empty wine bottles in 6 months, then you and I can never be friends. Sorry.
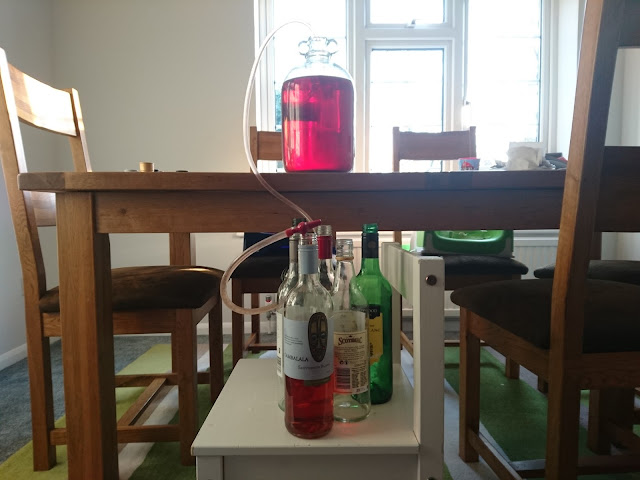
To siphon the wine, I advise setting the demijohn on a higher surface than the bottles. I usually place mine on the kitchen worktop with the bottles below it on one of my kids wooden chairs. Attach the tap to one end of the tube with the other placed into the clear liquid within the demijohn. Monitor this end during the process to make sure it does not dip into the sediment or it will end up in your finished wine.
At the beginning, to encourage the wine to run through the tube, you may need to suck briefly on the open tap until the wine comes through and then gravity will do the rest. Stop siphoning, obviously, just before you reach the sediment layer, then remove the tube before capping your bottles, labelling and giving yourself a huge pat on the back!
The bottled wine should ideally be left for a further two or three months to mature before drinking.
The bottled wine should ideally be left for a further two or three months to mature before drinking.
Whilst it is awfully tempting to drink a full gallon of wine straight from the demijohn, please don't. Alcohol poisoning is not a joke. I repeat, IT IS NOT A JOKE. Please drink responsibly.
Both my mum and I do this because it's fun to experiment with different produce, because the flavours are unlike anything you can buy at the supermarket and it's also a productive way of using up a glut of fruit or vegetables that would otherwise go to waste.
I hope you enjoy trying this recipe yourself and of course, I send my special thanks to Nana Wales, my wonderful mum, for showing me how to turn berries into booze.
Iachu da (cheers!).


Cool idea. Thanks for simple instructions that are easy to follow. xoxo
ReplyDeleteWhat a great idea! Thanks for sharing with #Blogstravaganza
ReplyDelete'if you're currently wondering how on earth you will be able to amass 6 empty wine bottles in 6 months, then you and I can never be friends. Sorry.'
ReplyDeleteI snorted wine out of my nose as I read this, obv got weird looks from husb, who when I told him also laughed and said I'd have no problem befriending you I could do 6 empties in 1 month! #blogstravaganza
I am definitely pinning this one for later! Can't wait to hear what it tastes like! Thanks so much for sharing with #Blogstravaganza xx
ReplyDeletei love this post and can not wait for the updates great idea #Blogstravaganza
ReplyDeleteI'm not even sure I've ever tried gooseberries but I love the idea of making my own wine! Might have to try them & pop back :)
ReplyDeleteAmazing!! My partner would love to try this. I'm not sure I have this much patience though, ha!
ReplyDeleteGreat post #dreamteam
oh wow sounds really amazing! #Blogstravaganza
ReplyDeleteOh wow, that's completely fascinating.I would never have thought of doing this with gooseberries. It looks like quite a lot of work, but it must be so satisfying having the end product in your hands. #DreamTeam
ReplyDeleteMy Grandad used to make his own wine and boy was it potent!! I dont recall trying any as I was very young but I remember him and my mum being pretty sozzled on it on many occassions! Id love to do it, but six months is too long for little impatient me!
ReplyDeleteThank you for sharing this with us at #TriumphantTales. I hope to see you back next week!
I've never made my own wine but my parents used to have a friend who would bring us round a homebrewed wine every so often. Sometimes great and other times almost undrinkable but we always loved receiving it! I can really see how it could become a passion.
ReplyDeleteMy red gooseberry bushes have finally started bearing fully, so this is on my list! (Especially remembering Hyacinth Bucket's purchase of several bottles of the Dowager Lady Ursula's home-made gooseberry wine...) They say you can make wine with just about any fruit or vegetable if you put your mind to it...
ReplyDelete